ASTRO轻应用 ASTROZERO-对接ModelArts Pro实现在应用中使用文字识别和自然语言处理能力:在脚本中调用连接器
时间:2024-07-17 13:46:36
在脚本中调用连接器
在脚本中,通过调用连接器,实现调用 ModelArts Pro 的接口。
- 参考创建空白AstroZero脚本中操作,创建一个空白脚本。
- 在脚本编辑器中,输入如下代码。
import * as modelartspro from 'modelartspro'; export class Input { @action.param({ type: "String", required: false, description: "the image url" }) url: string; @action.param({ type: "String", required: false, description: "the base64 coded image" }) image: string; @action.param({ type: "Boolean", required: false, description: "" }) isMultiTemplate: boolean @action.param({ type: "String", required: false, description: "" }) modelId: string } export class Output { @action.param({ type: "string" }) result: string; } export class testModelartsPro { @action.method({ input: "Input", output: "Output", description: "modelartspro test case" }) run(input: Input): void { // 填写实例化的modelartspro连接器名称 let client = modelartspro.newClient("custom_defined_ocr") let result = null result = client.customOCRWithURL(input.url, input.isMultiTemplate, input.modelId); console.log(result) } }代码modelartspro.newClient("custom_defined_ocr")中“custom_defined_ocr”为连接器的名称,如果连接器名称带有命名空间前缀,代码中也要携带。
- 单击脚本编辑器页面上方的
 ,保存脚本。
 - 保存成功后,单击
 ,运行脚本。
 - 在页面底部“输入参数”中,设置输入请求参数,单击测试窗口右上角的
 。
。{ "url": "https://XXXXXXXX/testModelArtsPro.jpg", "isMultiTemplate": true, "modelId": "0b7f0f28-27e2-11ec-8f30-0255ac100057" }其中,“url”为图片的URL。
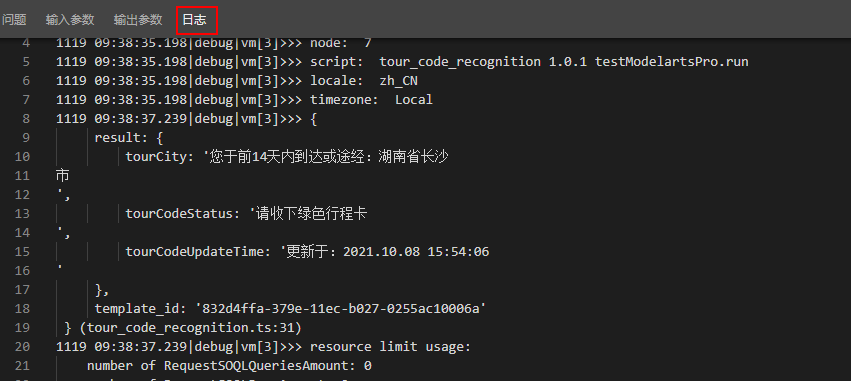
- 在日志页签,可查看到识别结果,表示脚本执行成功。
图5 查看日志

- 单击脚本编辑器页面上方的
 ,启用脚本。
support.huaweicloud.com/usermanual-astrozero/astrozero_05_9224.html
看了此文的人还看了
CDN加速
GaussDB
文字转换成语音
免费的服务器
如何创建网站
域名网站购买
私有云桌面
云主机哪个好
域名怎么备案
手机云电脑
SSL证书申请
云点播服务器
免费OCR是什么
电脑云桌面
域名备案怎么弄
语音转文字
文字图片识别
云桌面是什么
网址安全检测
网站建设搭建
国外CDN加速
SSL免费证书申请
短信批量发送
图片OCR识别
云数据库MySQL
个人域名购买
录音转文字
扫描图片识别文字
OCR图片识别
行驶证识别
虚拟电话号码
电话呼叫中心软件
怎么制作一个网站
Email注册网站
华为VNC
图像文字识别
企业网站制作
个人网站搭建
华为云计算
免费租用云托管
云桌面云服务器
ocr文字识别免费版
HTTPS证书申请
图片文字识别转换
国外域名注册商
使用免费虚拟主机
云电脑主机多少钱
鲲鹏云手机
短信验证码平台
OCR图片文字识别
SSL证书是什么
申请企业邮箱步骤
免费的企业用邮箱
云免流搭建教程
域名价格
推荐文章
- Astro低代码平台关键能力_低代码开发平台_华为云Astro-华为云
- 华为云Astro低代码开发平台的技术价值与使用体验_低代码开发平台_华为云Astro-华为云
- Astro轻应用_Astro大屏应用_分钟级构建业务大屏
- 华为云低代码平台_低代码开发平台_华为云Astro-华为云
- 调用GaussDB(DWS) API接口_数据仓库服务调用API_如何调用API_在DWS中调用API
- Astro轻应用_低代码开发平台Astro Zero_新手入门
- 可视化数据大屏开发_Astro Canvas_低代码平台-华为云
- Astro轻应用_零代码平台_开发无忧加速创新
- Astro轻应用_低代码开发平台Astro Zero_码农防脱神器
- 大屏应用Canvas_华为云Astro_低代码平台-华为云


 下载ASTRO轻应用 ASTROZERO用户手册完整版


